
PayPal整合支付
温馨提示:
本文最后更新于 2023年11月30日,已超过 967 天没有更新。若文章内的图片失效(无法正常加载),请留言反馈或直接联系我。
PayPal整合支付
官方文档https://developer.paypal.com/docs/checkout/standard/integrate/
一. 准备工作
在开发者控制台创建应用,生成clientId 和 clientSecret
- 客户端 ID:通过 PayPal 验证您的帐户并识别沙箱中的应用程序。
- 客户端密钥:授权沙箱中的应用程序。请妥善保管此秘密,不要泄露。
第三方工具:
- JavaScript SDK:添加 PayPal 支持的付款方式。
- Orders REST API:创建、更新、检索、授权和捕获订单(后台操作订单)
- npm:用于安装第三方库的依赖
其他web相关的准备工作参考官网文档
二. 整合支付
1.流程图
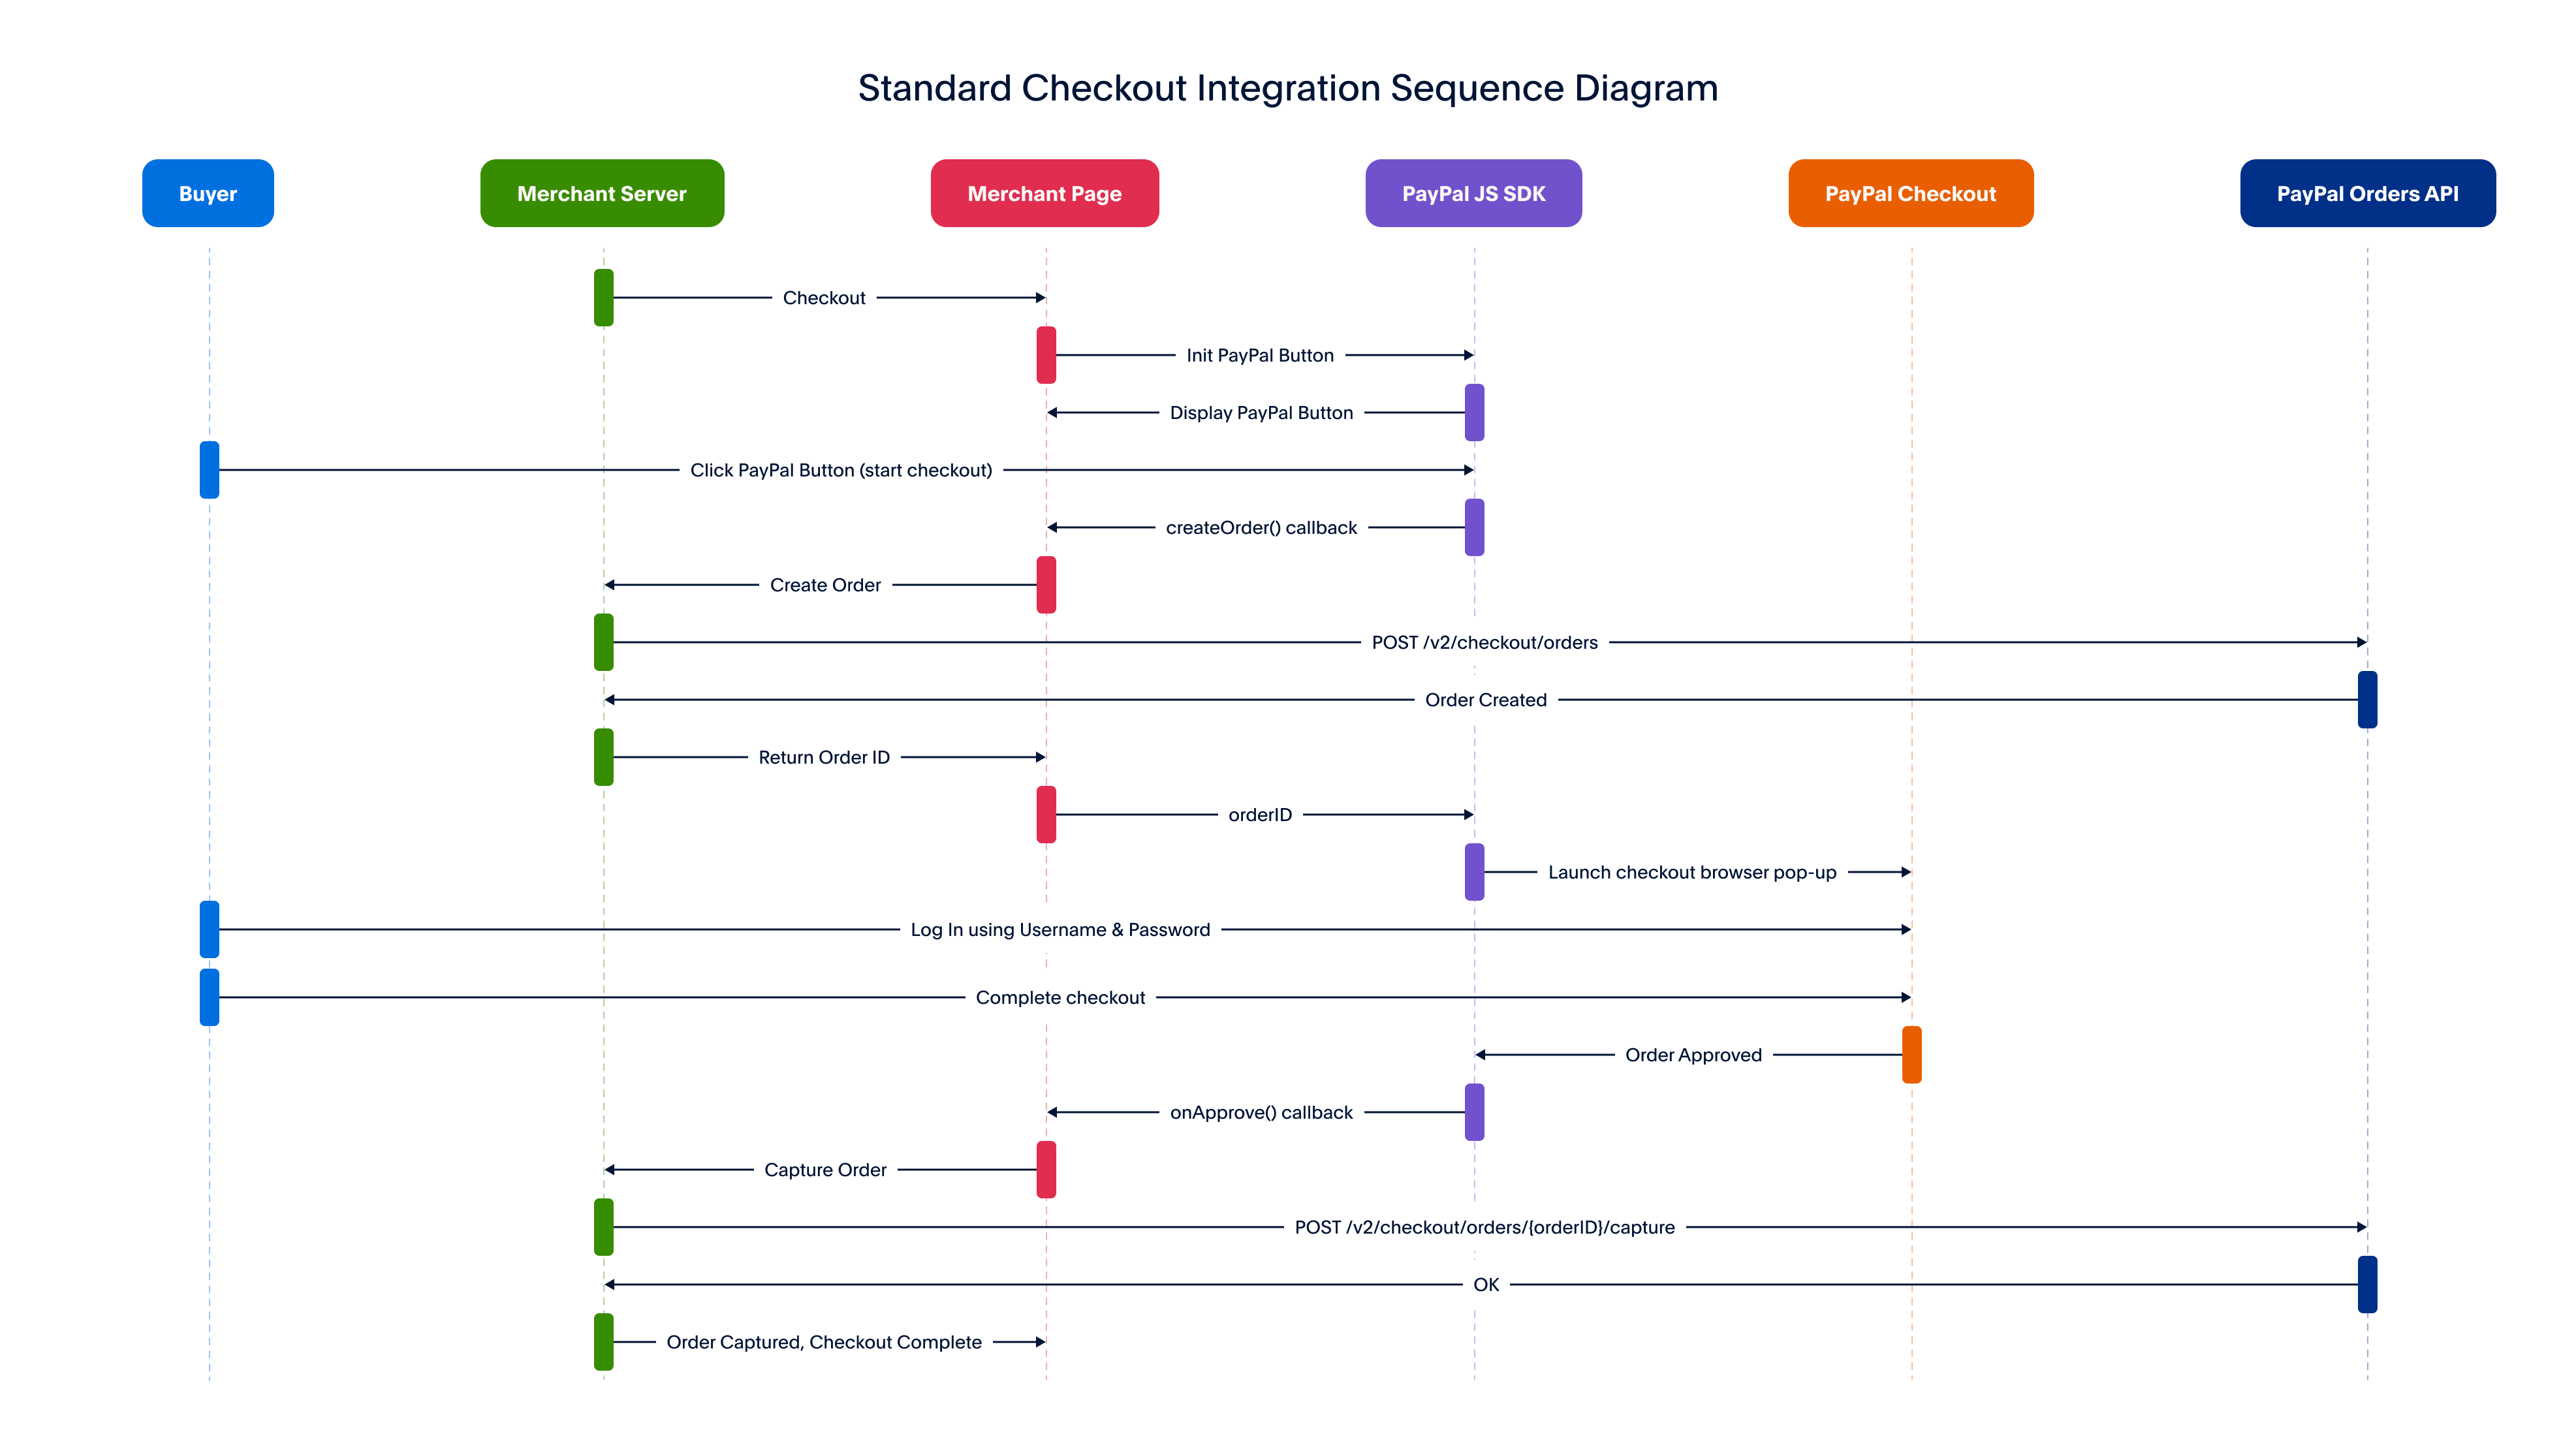
2. 整合开始
1.前端安装好库
前端已经安装好相关的库
npm install dotenv express node-fetch
2. 修改对应html
前端html,修改 ”你自己的clientId“
<!DOCTYPE html>
<html lang="en">
  <head>
    <meta charset="UTF-8">
    <meta name="viewport" content="width=device-width, initial-scale=1.0">
    <title>PayPal JS SDK Standard Integration</title>
  </head>
  <body>
    <div id="paypal-button-container"></div>
    <p id="result-message"></p>
    <!-- Replace the "test" client-id value with your client-id -->
    <script src="https://www.paypal.com/sdk/js?client-id=你自己的clientId"></script>
    <script src="app.js"></script>
  </body>
</html>
3.修改app.js代码
app.js 和html放在同一个目录下,如果不放在相同目录,html中需要修改一下app.js的引用路径
window.paypal
  .Buttons({
    //创建订单
    async createOrder() {
      try {
        //后台创建订单接口
        const response = await fetch("http://localhost:8866/createOrder", {
          method: "POST",
          headers: {
            "Content-Type": "application/json",
          },
          // use the "body" param to optionally pass additional order information
          // like product ids and quantities
          //请求参数,请根据需求自定义请求参数
          body: JSON.stringify({
            type:"card",
            cart: [
              {
                id: "YOUR_PRODUCT_ID",
                quantity: "YOUR_PRODUCT_QUANTITY",
              },
            ],
          }),
        });
        //返回数据
        const orderDataTemp = await response.json();
        const orderData = orderDataTemp.data
        console.log("订单id==="+orderData.id)
        if (orderData.id) {
          return orderData.id;
        } else {
          const errorDetail = orderData?.details?.[0];
          const errorMessage = errorDetail
            ? `${errorDetail.issue} ${errorDetail.description} (${orderData.debug_id})`
            : JSON.stringify(orderData);

          throw new Error(errorMessage);
        }
      } catch (error) {
        console.error(error);
        resultMessage(`Could not initiate PayPal Checkout...<br><br>${error}`);
      }
    },
    //捕获订单--确认付款后调用
    async onApprove(data, actions) {
      console.log(data.orderID)
      try {
        //后台捕获订单接口
        const response = await fetch(`http://localhost:8866/captureOrderTwo/${data.orderID}`, {
          method: "POST",
          headers: {
            "Content-Type": "application/json",
          },
        });
        //返回参数
        const orderDataTemp = await response.json();
        const orderData = orderDataTemp.data
        // Three cases to handle:
        //   (1) Recoverable INSTRUMENT_DECLINED -> call actions.restart()
        //   (2) Other non-recoverable errors -> Show a failure message
        //   (3) Successful transaction -> Show confirmation or thank you message

        const errorDetail = orderData?.details?.[0];

        if (errorDetail?.issue === "INSTRUMENT_DECLINED") {
          // (1) Recoverable INSTRUMENT_DECLINED -> call actions.restart()
          // recoverable state, per https://developer.paypal.com/docs/checkout/standard/customize/handle-funding-failures/
          return actions.restart();
        } else if (errorDetail) {
          // (2) Other non-recoverable errors -> Show a failure message
          throw new Error(`${errorDetail.description} (${orderData.debug_id})`);
        } else if (!orderData.purchase_units) {
          throw new Error(JSON.stringify(orderData));
        } else {
          // (3) Successful transaction -> Show confirmation or thank you message
          // Or go to another URL:  actions.redirect('thank_you.html');
          const transaction =
            orderData?.purchase_units?.[0]?.payments?.captures?.[0] ||
            orderData?.purchase_units?.[0]?.payments?.authorizations?.[0];
          resultMessage(
            `Transaction ${transaction.status}: ${transaction.id}<br><br>See console for all available details`,
          );
          console.log(
            "Capture result",
            orderData,
            JSON.stringify(orderData, null, 2),
          );
        }
      } catch (error) {
        console.error(error);
        resultMessage(
          `Sorry, your transaction could not be processed...<br><br>${error}`,
        );
      }
    },
  })
  .render("#paypal-button-container");

// Example function to show a result to the user. Your site's UI library can be used instead.
function resultMessage(message) {
  const container = document.querySelector("#result-message");
  container.innerHTML = message;
}
4.后台接口
    @ApiOperation(value = "创建订单", notes = "")
    @PostMapping("/createOrder")
    public ResponseResult createOrder(
            @RequestBody Map<String,Object> params,
            HttpServletRequest request) {
        //参数根据自己需求来
        return commonService.createOrder(request,params);
    }

    @ApiOperation(value = "确认订单", notes = "")
    @PostMapping("/captureOrderTwo/{orderId}")
    public ResponseResult captureOrderTwo(
            @PathVariable String orderId,
            HttpServletRequest request) {
        System.out.println(orderId);
        Map<String,Object> params = new HashMap<>();
        params.put("orderId",orderId);
        //参数根据自己需求来
        return commonService.captureOrder(request,params);
    }
5. 实现
- 获取token
    public String getToken() throws Exception{
        String key = redisUtil.getKey("paypalToken");
        if (!StringUtils.isEmpty(key)){
            return key;
        }
        //沙箱
        String clientId = "xxx";
        String clientSecret = "xxx";
        String credentials = clientId + ":" + clientSecret;
        String encodedCredentials = Base64.getEncoder().encodeToString(credentials.getBytes(StandardCharsets.UTF_8));
        OkHttpClient client = new OkHttpClient().newBuilder()
                .build();
        MediaType mediaType = MediaType.parse("application/x-www-form-urlencoded");
        RequestBody body = RequestBody.create(mediaType, "grant_type=client_credentials");
        Request request = new Request.Builder()
                .url("https://api-m.sandbox.paypal.com/v1/oauth2/token")
                .method("POST", body)
                .addHeader("Content-Type", "application/x-www-form-urlencoded")
                .addHeader("Authorization", "Basic " + encodedCredentials)
                .build();
        Response response = client.newCall(request).execute();
        JSONObject jsonObject = JSON.parseObject(response.body().string(), JSONObject.class);
        String string = jsonObject.getString("access_token");
        redisUtil.setex("paypalToken",string,jsonObject.getLong("expires_in"));
        return string;
    }
token返回参数示例:
    {
  "scope": "https://uri.paypal.com/services/invoicing https://uri.paypal.com/services/disputes/read-buyer https://uri.paypal.com/services/payments/realtimepayment https://uri.paypal.com/services/disputes/update-seller https://uri.paypal.com/services/payments/payment/authcapture openid https://uri.paypal.com/services/disputes/read-seller https://uri.paypal.com/services/payments/refund https://api-m.paypal.com/v1/vault/credit-card https://api-m.paypal.com/v1/payments/.* https://uri.paypal.com/payments/payouts https://api-m.paypal.com/v1/vault/credit-card/.* https://uri.paypal.com/services/subscriptions https://uri.paypal.com/services/applications/webhooks",
  "access_token": "A21AAFEpH4PsADK7qSS7pSRsgzfENtu-Q1ysgEDVDESseMHBYXVJYE8ovjj68elIDy8nF26AwPhfXTIeWAZHSLIsQkSYz9ifg",
  "token_type": "Bearer",
  "app_id": "APP-80W284485P519543T",
  "expires_in": 31668,
  "nonce": "2020-04-03T15:35:36ZaYZlGvEkV4yVSz8g6bAKFoGSEzuy3CQcz3ljhibkOHg"
}
创建订单
writer里面的参数请根据实际需求填写
    public ResponseResult createOrder(HttpServletRequest request, Map<String, Object> params) {
        try {
            String type = (String)params.get("type");
            type = StringUtils.isEmpty(type)?"paypal":type;
            System.out.println("请求方式是=="+type);
            String token =getToken();
            System.out.println(token);
            String string = UUID.randomUUID().toString();
            System.out.println(string);
            URL url = new URL("https://api-m.sandbox.paypal.com/v2/checkout/orders");
            HttpURLConnection httpConn = (HttpURLConnection) url.openConnection();
            httpConn.setRequestMethod("POST");
            httpConn.setRequestProperty("Content-Type", "application/json");
            httpConn.setRequestProperty("PayPal-Request-Id", string);
            httpConn.setRequestProperty("Authorization", "Bearer "+token);

            httpConn.setDoOutput(true);
            OutputStreamWriter writer = new OutputStreamWriter(httpConn.getOutputStream());
            writer.write("{ \"intent\": \"CAPTURE\", \"purchase_units\": [ { \"reference_id\": \"d9f80740-38f0-11e8-b467-0ed5f89f718b\", \"amount\": { \"currency_code\": \"USD\", \"value\": \"1.00\" } } ], \"payment_source\": { \""+type+"\": { \"experience_context\": { \"payment_method_preference\": \"IMMEDIATE_PAYMENT_REQUIRED\", \"brand_name\": \"EXAMPLE INC\", \"locale\": \"en-US\", \"landing_page\": \"LOGIN\", \"user_action\": \"PAY_NOW\", \"return_url\": \"https://example.com/returnUrl\", \"cancel_url\": \"https://example.com/cancelUrl\" } } } }");
            writer.flush();
            writer.close();
            httpConn.getOutputStream().close();

            InputStream responseStream = httpConn.getResponseCode() / 100 == 2
                    ? httpConn.getInputStream()
                    : httpConn.getErrorStream();
            Scanner s = new Scanner(responseStream).useDelimiter("\\A");
            String response = s.hasNext() ? s.next() : "";
            JSONObject jsonObject = JSON.parseObject(response, JSONObject.class);
            System.out.println(jsonObject.toJSONString());
            return ResponseResult.success(jsonObject);
        }catch (Exception e){
            e.printStackTrace();
        }
        return ResponseResult.error(ResponseType.ERROR);
    }
确认订单
PayPal-Request-Id参数可以修改为用户的id
    public ResponseResult captureOrder(HttpServletRequest request, Map<String, Object> params) {
        try {
            String token = getToken();
            URL url = new URL("https://api-m.sandbox.paypal.com/v2/checkout/orders/"+params.get("orderId")+"/capture");
            HttpURLConnection httpConn = (HttpURLConnection) url.openConnection();
            httpConn.setRequestMethod("POST");

            httpConn.setRequestProperty("Content-Type", "application/json");
            httpConn.setRequestProperty("PayPal-Request-Id", "7b92603e-77ed-4896-8e78-5dea2050476a");
            httpConn.setRequestProperty("Authorization", "Bearer "+token);

            InputStream responseStream = httpConn.getResponseCode() / 100 == 2
                    ? httpConn.getInputStream()
                    : httpConn.getErrorStream();
            Scanner s = new Scanner(responseStream).useDelimiter("\\A");
            String response = s.hasNext() ? s.next() : "";
            System.out.println(response);
            return ResponseResult.success(JSON.parseObject(response, JSONObject.class));
        }catch (Exception e){
            e.printStackTrace();
        }
        return ResponseResult.error(ResponseType.ERROR);
    }
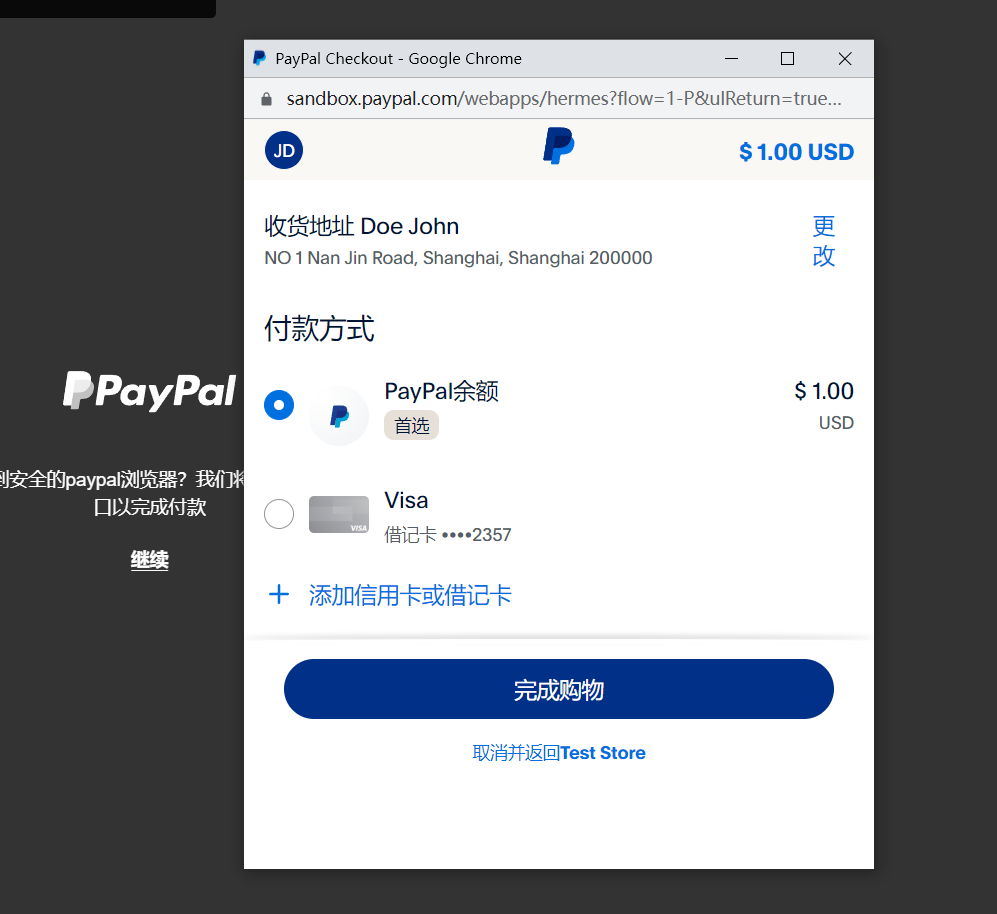
3. 测试
前端打开页面,点击paypal支付,会提示登录paypal账号,登录后点击完成购物即可。此时使用准备好的沙箱账号登录即可。支付成功后,后台需要进行相关的订单校验等操作。。。。

正文到此结束
- 本文标签: Java 其他
- 本文链接: https://www.tianyajuanke.top/article/73
- 版权声明: 本文由吴沛芙原创发布,转载请遵循《署名-非商业性使用-相同方式共享 4.0 国际 (CC BY-NC-SA 4.0)》许可协议授权
热门推荐


相关文章
近期评论
-
来自: Linux安装python环境

-
来自: 留言板

-
来自: Linux环境安装mysql、git、docker、nginx

-
来自: vue 阿里云服务端签名直传

-
来自: Spring Session Data Redis